FSOC Command Line Utility
FSOC Utility
The FSOC utility, fsoc, provides a command line interface to help developers manage their solutions lifecycle and interact with the core services and solutions currently available in the platform.
The fsoc binary is one executable file that is specific to your flavor of OS. Once you download the binary file, you’ll want to:
- Rename it, if needed, to (all lower case) fsoc
- Add it in your system path so you can execute fsoc commands in any directory within your terminal.
- Create a directory structure on your file system where you will work with and manage Platform Solutions.
- Configure fsoc so you can login to your Platform Tenant.
- Review the fsoc and Platform documentation.
- Create your first Platform Solution!
![]()
Downloads and documentation
Below are some links to get you started.
- FSOC GitHub repository
FSOC downloads Page
FSOC documentation on DevNet
Cisco Observability Platform documentation on DevNet
![]()
Local file system preparation
There is no requirement to adhere to the directory structure referred to below. It is simply a suggestion based on real life experience that can help you keep things organized and increase your productivity working with FSO Platform solutions. All of the files that fsoc generates for your solution will be created on your local workstation so it would be wise to store all the source files in a repository of your choice like GitHub as you progress during your solution development.
- FSOC projects root directory.
- Subdirectory denoting the Platform tenant (typically you’ll have just one tenant though).
- Subdirectory denoting the name of the solution (all files for the specific solution reside here).

![]()
Guide assumptions
As we walk through this guide going forward, we will be using the sample directory structure in all the examples for the fsoc commands.
- FSOC projects root directory.
- Subdirectory denoting the Platform tenant.
- Subdirectory denoting the name of the solution.

![]()
Handy tools for your toolbox
- Visual Studio Code IDE or equivalent is a must have for solution development. It’s hard to find a better light-weight IDE than VS Code that makes it so easy to navigate the plethora of json files and directories that comprise a platform solution, has a reliable, user friendly project wide search and replace, and it’s free.
- Browser Developer Tools (Chrome Developer Tools)
- Schema Browser and Query Builder (part of the platform tenant UI)
![]()
Configure FSOC
While fsoc supports multiple login types, we will only look at two of them for the purposes of this guide.
- Service Principal
- Used for almost all fsoc commands (when working with a solution)
- Agent Principal
- Used for fsoc melt push (when sending sample MELT data for your solution)
![]()
Create a service principal
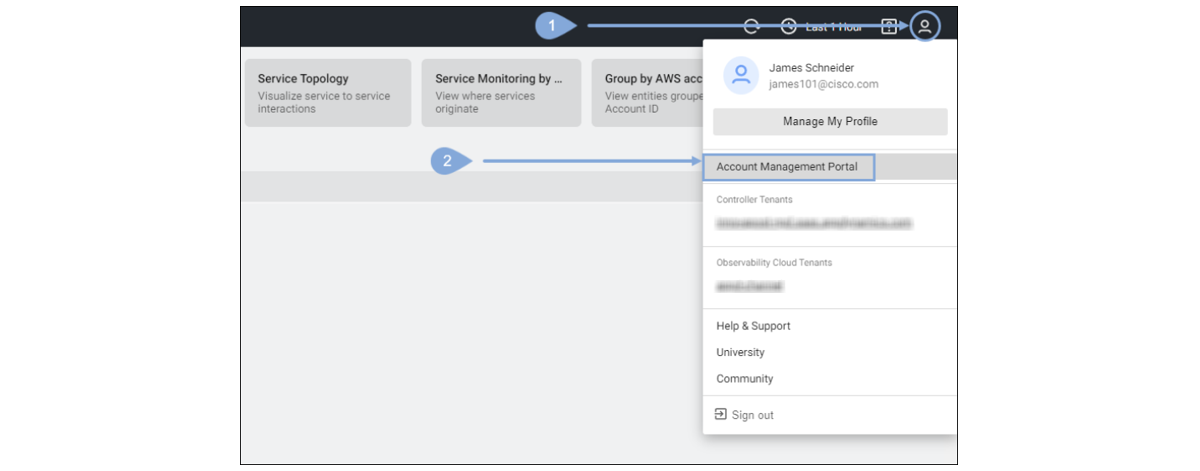
First you need to login to your FSO Tenant (https://<tenant_name>.observe.appdynamics.com). You will need to login with a user that has the “Company Admin” role to create a service principal.
- Click on the user profile icon.
- Select “Account Management Portal” from the drop-down menu.
- Now click on Access Management
- Click on Service Principals
- Click on the + icon.
- Enter Name, Description, leave Authentication Type as Basic, Edit Role Access and select all roles except the licensing related role then click the Save button.
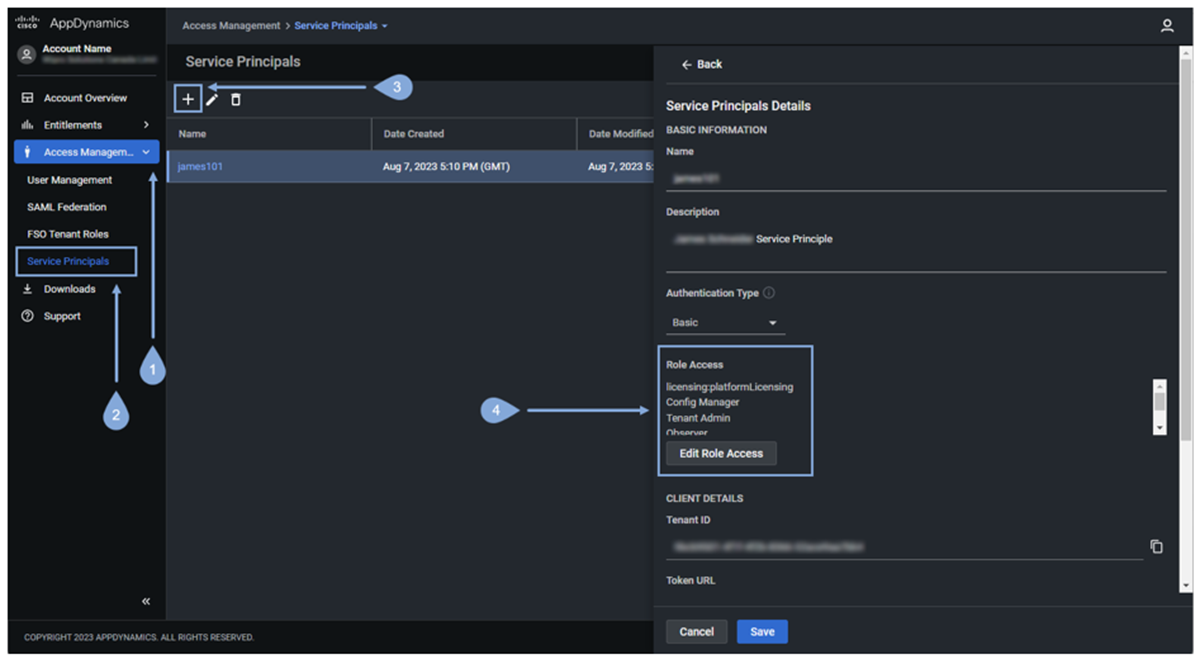
Next, download the secrets.json file to the directory for your tenant that you created earlier under your fsoc_projects directory.

Now rename the secrets.json file name to service-principal.json
![]()
What is a profile?
When you use the example command shown below to configure fsoc with your service principal (secrets.json file renamed to service-principal.json), you must specify a profile-name which represents the context that you are currently using to execute subsequent fsoc commands.
For example, while you can issue most fsoc commands using your profile related to your service principal, you will need to use a different profile (an agent-principal profile) to execute the fsoc melt push command (we’ll configure an agent-principal profile after we configure the service-principal profile).
Create local service profile
| fsoc command to configure a service pricipal | |
| Command Format: | fsoc config set --profile <profile-name> auth=service-principal secret-file=<full-path-to-service-principal.json> |
| Windows Example: | fsoc config set --profile my-sp-profile auth=service-principal secret-file=C:\fsoc_projects\my_tenant\service-principal.json |
| Unix-Mac Example: | fsoc config set --profile my-sp-profile auth=service-principal secret-file=/fsoc_projects/my_tenant/service-principal.json |
Dev Tip You must use the fully qualified path to your service principal file with this command, even if you are running the command in the directory where the file resides. It is recommended that the path to that file contain no spaces in the path.
Now we are ready to configure fsoc to connect to our tenant with a service principal.
Windows Example Commands:
cd C:\fsoc_projects\my_tenant

fsoc config set --profile my-sp-profile auth=service-principal secret-file=C:\fsoc_projects\my_tenant\service-principal.json
Unix-Mac Example Commands:
cd /fsoc_projects/my_tenant

fsoc config set --profile my-sp-profile auth=service-principal secret-file=/fsoc_projects/my_tenant/service-principal.json
![]()
Create an agent principal
You need to login to your FSO Tenant (https://
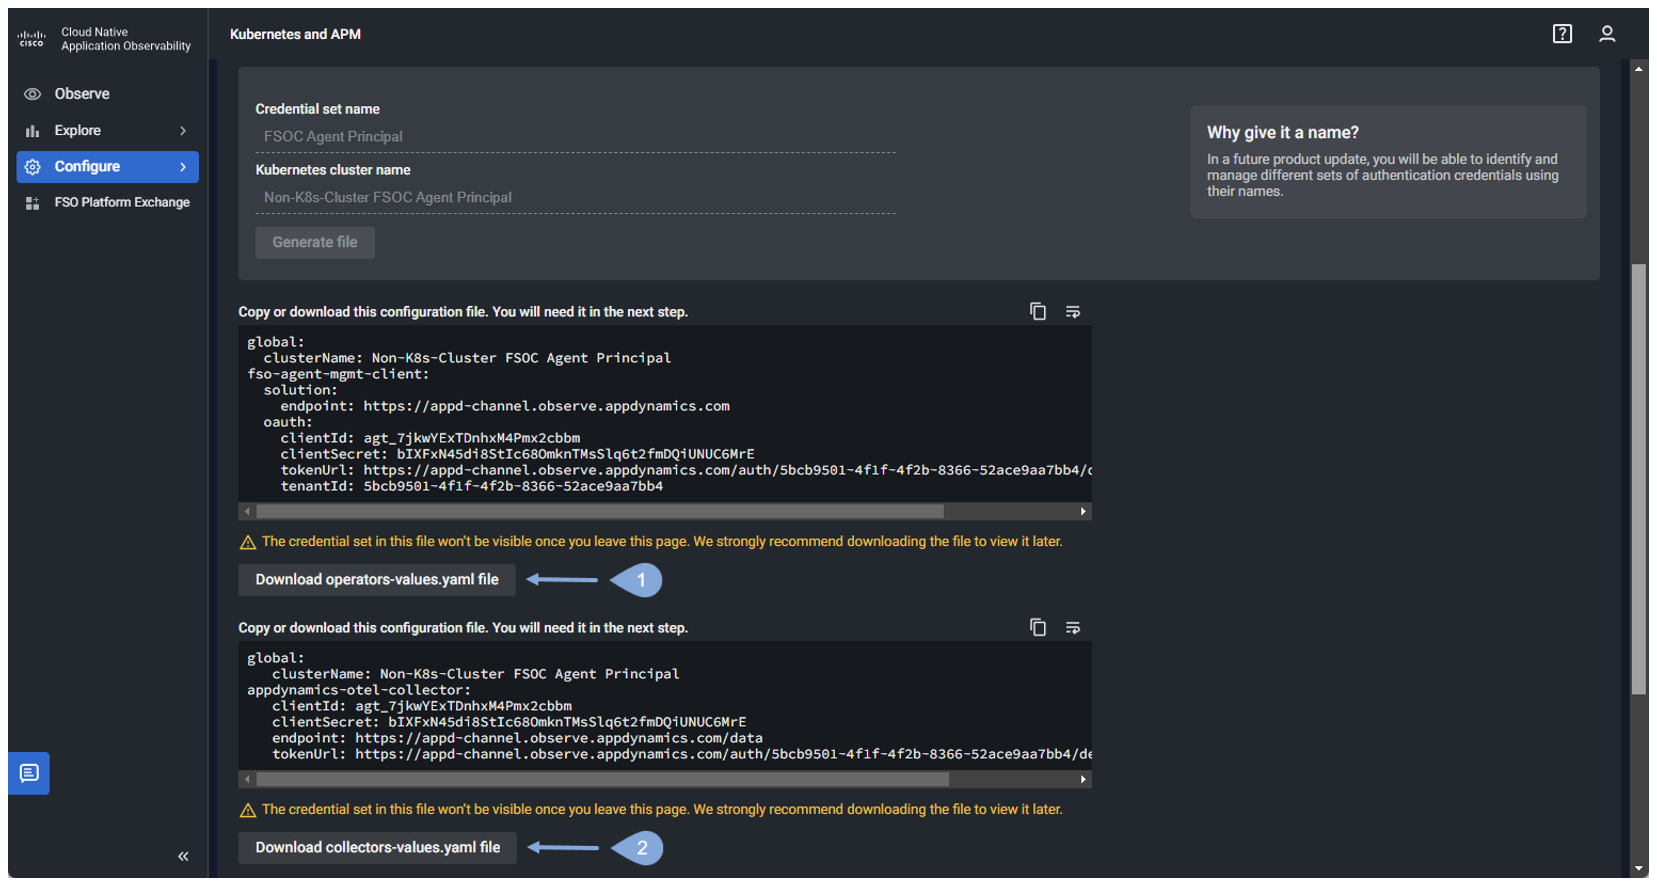
- Click on “Configure”.
- Click on “Kubernetes and APM”.
- Enter values for “Credential set name” & “Kubernetes cluster name”, then click on “Generate file”.

Next, download both YAML files to the directory for your tenant that you created earlier under your “fsoc_projects” directory.
- Click on “Download operators-values.yaml file” to the directory for your tenant that you created earlier under your “fsoc_projects” directory (you won’t need this file to configure the agent principal, for fsoc but we’ll download it anyway for now).
- Click on “Download collectors-values.yaml file” to the directory for your tenant that you created earlier under your “fsoc_projects” directory (this is the file we will use to configure the agent principal).
Create local agent profile
| fsoc command to configure a agent pricipal | |
| Command Format: | fsoc config set --profile <profile-name> auth=agent-principal secret-file=<full-path-to-collectors-values.yaml> |
| Windows Example: | fsoc config set --profile my-ap-profile auth=agent-principal secret-file=C:\fsoc_projects\my_tenant\collectors-values.yaml |
| Unix-Mac Example: | fsoc config set --profile my-ap-profile auth=agent-principal secret-file=/fsoc_projects/my_tenant/collectors-values.yaml |
Now we are ready to configure fsoc to connect to our tenant with an agent principal by creating a local agent prinicipal profile.
Dev Tip You must use the fully qualified path to your agent principal file with this command, even if you are running the command in the directory where the file resides. It is recommended that the path to that file contain no spaces in the path.
Windows Example Commands:
cd C:\fsoc_projects\my_tenant

fsoc config set --profile my-ap-profile auth=agent-principal secret-file=C:\fsoc_projects\my_tenant\collectors-values.yaml
Unix-Mac Example Commands:
cd /fsoc_projects/my_tenant

fsoc config set --profile my-ap-profile auth=agent-principal secret-file=/fsoc_projects/my_tenant/collectors-values.yaml
![]()
Profile contexts
If you need to switch between profiles, you can always use the commands seen below.
| fsoc command to change to a specific pricipal | |
| Command Format: | fsoc config use <profile-name> |
| Example: | fsoc config use my-sp-profile |
fsoc config use my-sp-profile
If you want to check which profile you are currently using, use the command seen below.
| fsoc command to check current profile | |
| Command Format: | fsoc config get |
fsoc config get
![]()
Login with fsoc
First, run the fsoc config use command with the profile name related to your service principal.
fsoc config use my-sp-profile
Now run the fsoc login command.
fsoc login

![]()
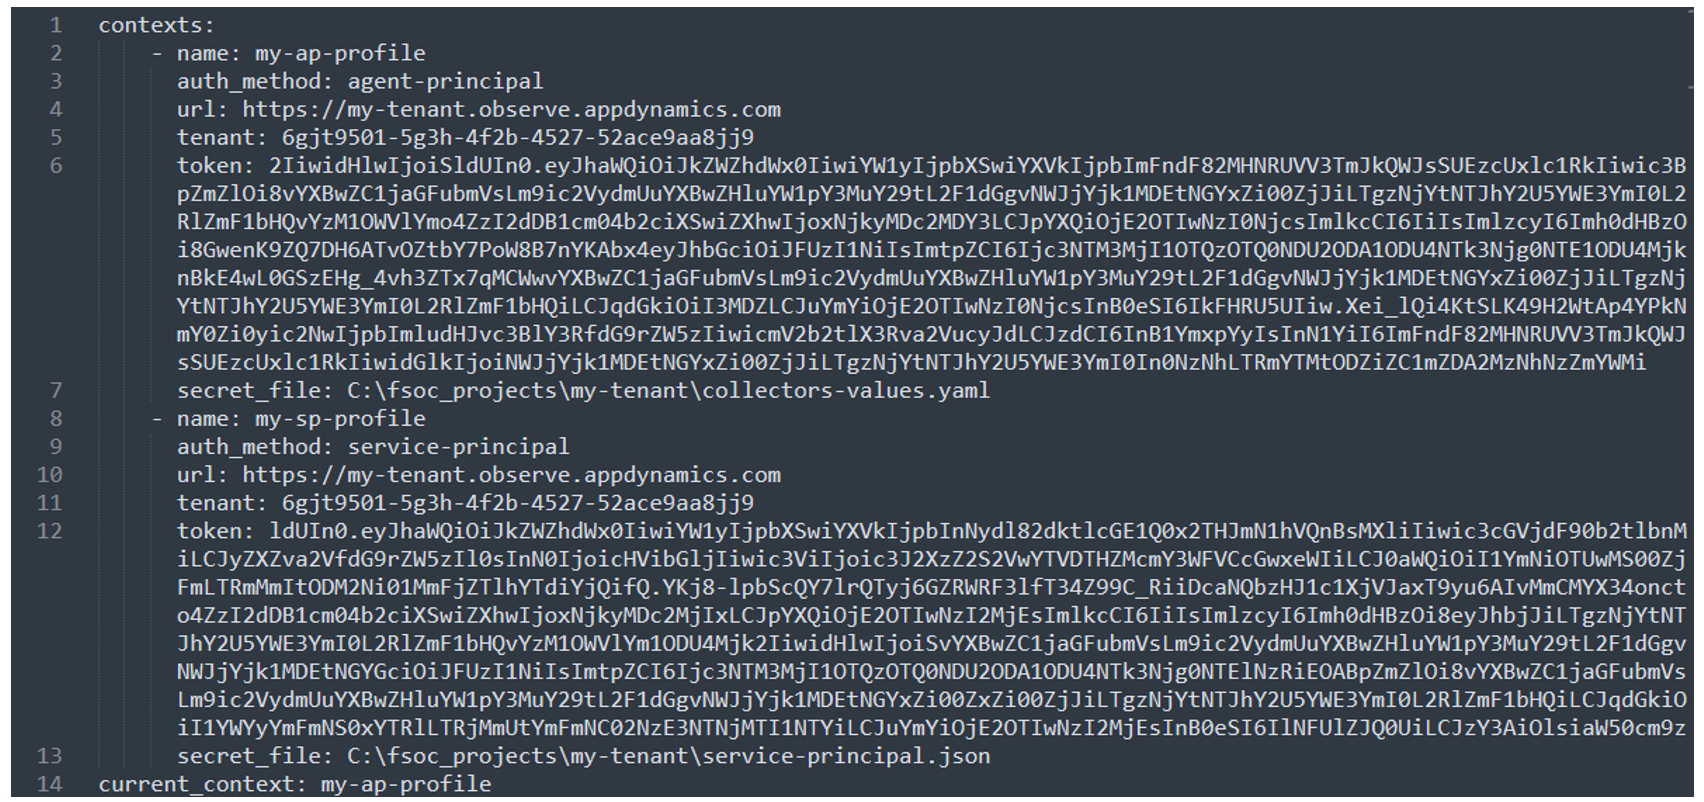
###W Locate fsoc configuration file
It would be very rare if your fsoc configuration gets corrupted, but just in case it does, you can delete the fsoc configuration file and then re-create your profiles (fsoc config set). The fsoc configuration file (named .fsoc) is typically found in your OS users home directory. The .fsoc configuration file is a hidden file, so you may need to ensure you are inspecting your home directory with hidden files visible.

Below is an example of what the .fsoc config file looks like after creating an agent and service principal profile.
![]()
Next
We’ll look at a summary of the steps involved in the solution development process.